

The Catskills Blue House sits on three acres of wooded land, and much like the hytte itself, we’ve kept it intentionally simple. A few deck chairs and a table (these were actually our very first pieces of “furniture” at the house), and a fire pit for smores and pølser (translate: hot dogs). The rest is up to your imagination.


These photos were taken by the insanely talented Paula B. earlier this year.


However, we are still holding out hope that the world goes back to normal someday, and that when that someday comes we’ll be opening our rental and showroom doors to guests again, so how I wanted to make sure I built something that doesn’t disturb the serenity of the property.But now that we’re up here fulltime and the spring weather is starting to peek out, I wanted to create a space for the girls to play outside. Let’s be real, I am a fulltime working mamma and as much as I love my recent side gig also as a daycare provider, I am trying to squeeze in time for those spreadsheets as well. I don’t always have time for imagination.
Because let me just tell you, a lot of the options for playground kits out there are, pardon my french, absolute hideous monstrosities. There are also some INSANELY cool custom options, but, ahem, I wouldn’t drop $7k on a playground if I’d won the lottery.
We knew wanted a sturdy wooden swing set, both for aesthetic reasons, but also for durability. Dollhouses are fairly common in Norway (I remember I would see other cabins with them as a kid and was always jealous until my brothers and I built a treehouse which was obviously way cooler) so I considered a few options, but a good playground really needs a slide. That’s when I came across just the sweetest little wooden playhouse from Swing ‘n Slide. Quaint and quirky, I couldn’t believe how closely the roofline matched that of the Blue House!

The next step was finding the right plot of land for the playground. The property is relatively hilly, and I definitely did not want to disturb the direct line of sight to the mountains. But there is a small grove behind the woodshed, where I could see the playground tuck neatly in but I’d still be able to easily see it from the kitchen window and deck. Perfect. So I spent the next five hours racking and shoveling to level the ground (protip: the built-in level on my phone is a lifesaver.)


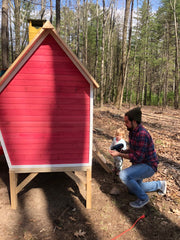
Both kits were fairly easy to put together, but this is definitely a two-person job. For the swingset, the biggest challenge was really anchoring as the soil here is fairly rocky and tough to dig through. Though the playhouse assembly was detailed, the kit was well organized. We used a couple of sawhorses, the drill, and a socket wrench and were able to put this all together in just a couple of hours (we snuck in a lot of this during naptime over the weekend)!


I obviously can’t consider this project completely done and dusted until I can get my hands on some paint and truly make this little playground an extension of the Blue House. But let me just tell you: I had a cup of coffee on the deck this morning and wrote this entire post while the girls happily romped about on their new playground. Worth. Every. Penny.
0 comments